Have you ever struggled trying to setup a clean debugging environment for your native Android app ?
Then this article is for you !
0. Debugging is a key feature !
Having an efficient debugging environment is a key factor not only for robustness, but also for efficient development.
And as a matter of fact, QtCreator allows you to debug an Android app kinda "out of the box" - at least if you use their build and deploy pipeline.
Unfortunately, for our more general case, where we have our custom pipeline, it just doesn’t work !
So lately, we have invested time in integrating a decent debugging solution to our new Android workflow.
And we think you should do the same.
Really.
But looking at the internet, it seems that even after a few years, many people are still struggling with native debugging on Android. And obviously, there are many pitfalls.
Since we’re a pretty nice bunch of guys (yes we are!), we thought we could share our work and help a little.
| It’s all based on Windows & QtCreator 3.4, but this will work for Linux & OSX as well. |
|
We are assuming that you can build and delpoy a native app already. (if not, you can read our previous article on FW4SPL and Android). |
This article is a bit long, but it’s mostly setup & explanations.
⇒ At the end you will be able to debug using QtCreator (with breakpoints and all) just by pressing F6 then Enter !
-
And this without having to root your Android device !
1. Short explanation : gdb & gdbserver
A debugging session on Android will require gdb and gdbserver to communicate, and specificaly those provided in the android-ndk.
As for now, this is the official and only way of debugging that Google provides.
In a nutshell…
Gdb (on your computer) needs to connect to gdbserver (on the android device), so that it can send the debug commands of the user, and retrieve debug informations in return.
Obviously, before that gdbserver has to be launched on the device, and attached to the Android process to debug.
Also, in order to exchange valid debug data, gdb must be taught a few things that it cannot "just guess", e.g. where to find local copies of the executable to debug, the linked libraries, the other system libraries - cf. "retrieving the sysroot".
2. Setup
Ok, now before being able to debug, you will need to prepare your environment, which means :
-
retrieve a local copy of the sysroot of your device
-
put gdbserver in your apk and have a script to start it
-
setup QtCreator
2.1. Sysroot
-
To get a copy of the sysroot of your device, first make sure you plugged it to your computer, and that it’s recognized when you launch the command :
adb devices-
Then, for ease of use, we provide the script https://raw.githubusercontent.com/fw4spl-org/android-cmake/master/pull_sysroot.py.
It does the whole sysroot pulling in one command, and goes something like :
pull_sysroot.py MyNexus C:/Tmp| Of course you specify the name you want, and the path you want… just remember that you will use them later (cf. 2.3 and 3.) |
As a result, you will have the sysroot of your device copied to "C:/Tmp/MyNexus/"
That’s it !
Not only will it "adb pull" the most important files /system/bin/app_process and /system/bin/linker, but also the libraries in /system/lib/ and /vendor/lib/.
Now, for your information :
-
app_process : entry point for the debugger, since it is responsible for starting any Activity on Android
-
linker : required to set breakpoints
|
From one device to another, app_process can either be a binary file or a symlink to the actual binary file. And because pulling a symlink just doesn’t work, the script will try to pull the various files it may point to, i.e. app_process32, app_process64, or app_process_init (… or something else ?) ⇒ So be sure to use the right version that you pulled - it’s printed at the end of the execution of the sript. |
2.2. gdbserver
-
First, when you build the apk of the app you want to debug, make sure you put a copy of "gdbserver" in its libs directory
⇒ and call this copy "libgdbserver.so"
|
The right copy of "gdbserver" to use can be found in your "android-ndk\prebuilt\android-arm\gdbserver\" directory. |
|
I strongly advise you to set up once for all your build pipeline so as to do this copy for every Android debug build. That’s what we have done, and that’s pretty neat ! |
-
Then get a copy of the script https://raw.githubusercontent.com/fw4spl-org/android-cmake/master/start_gdbserver.py, and modify its vars ANDROID_APK_PACKAGE and ACTIVITY_NAME to match your app.
| This script will be in charge of launching the app to debug on the device, and attaching the gdbserver packaged with it to this app, leaving it waiting for a connection from gdb (on the port 5039). |
2.3. QtCreator
To make things easier for everyone, I provide here a complete set of screenshots.
⇒ use them to setup your QtCreator.
-
First, make sure QtCreator knows the paths to your android sdk & ndk (cf. Tools > Android).
-
Then, following the policy of QtCreator, we will need to create a Kit per type of Android device we will want to use for debugging, since 1 Kit = 1 sysroot.
|
Be careful, here is a first trick : In the fields "Device Type" and "Device", you MUST specify "Desktop" and "Local PC" ! (Why ? Because if you set "Android device" instead, QtCreator will use another communication scheme between gdb and gdbserver, and that just does NOT work for us) |
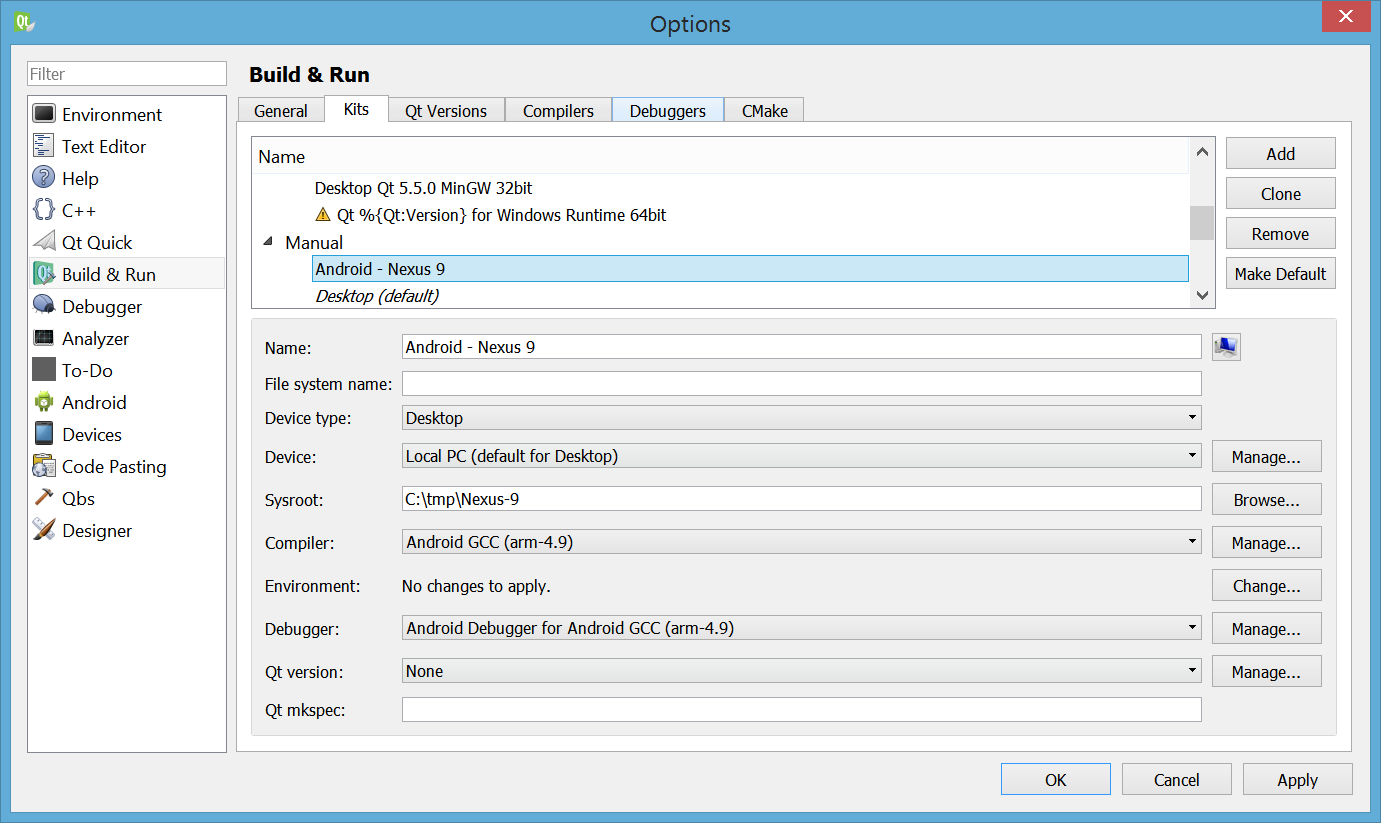
-
In the Additional Startup Commands of the GDB panel, we tell gdb :
-
to execute the non blocking script "C:/Dev/Scripts/start_gdbserver.py"
(gdb command "source") -
where on our local host to search for the .so libraries of our app
(gdb command set "solib-search-path")
-
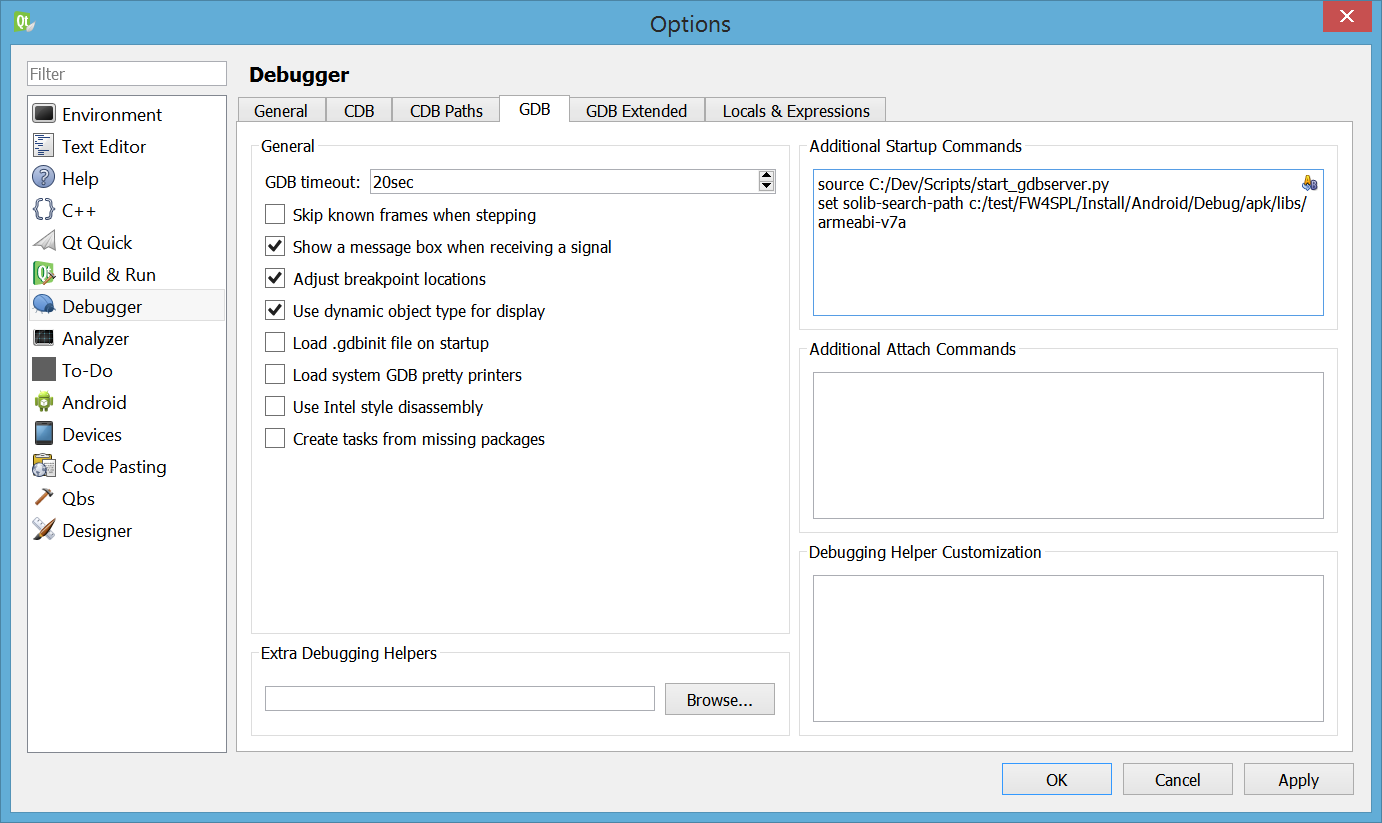
-
The GDB Extended panel contains one critical option :
-
"use asynchronous mode to control the inferior"
-
| Did I say it was a critical option ? |
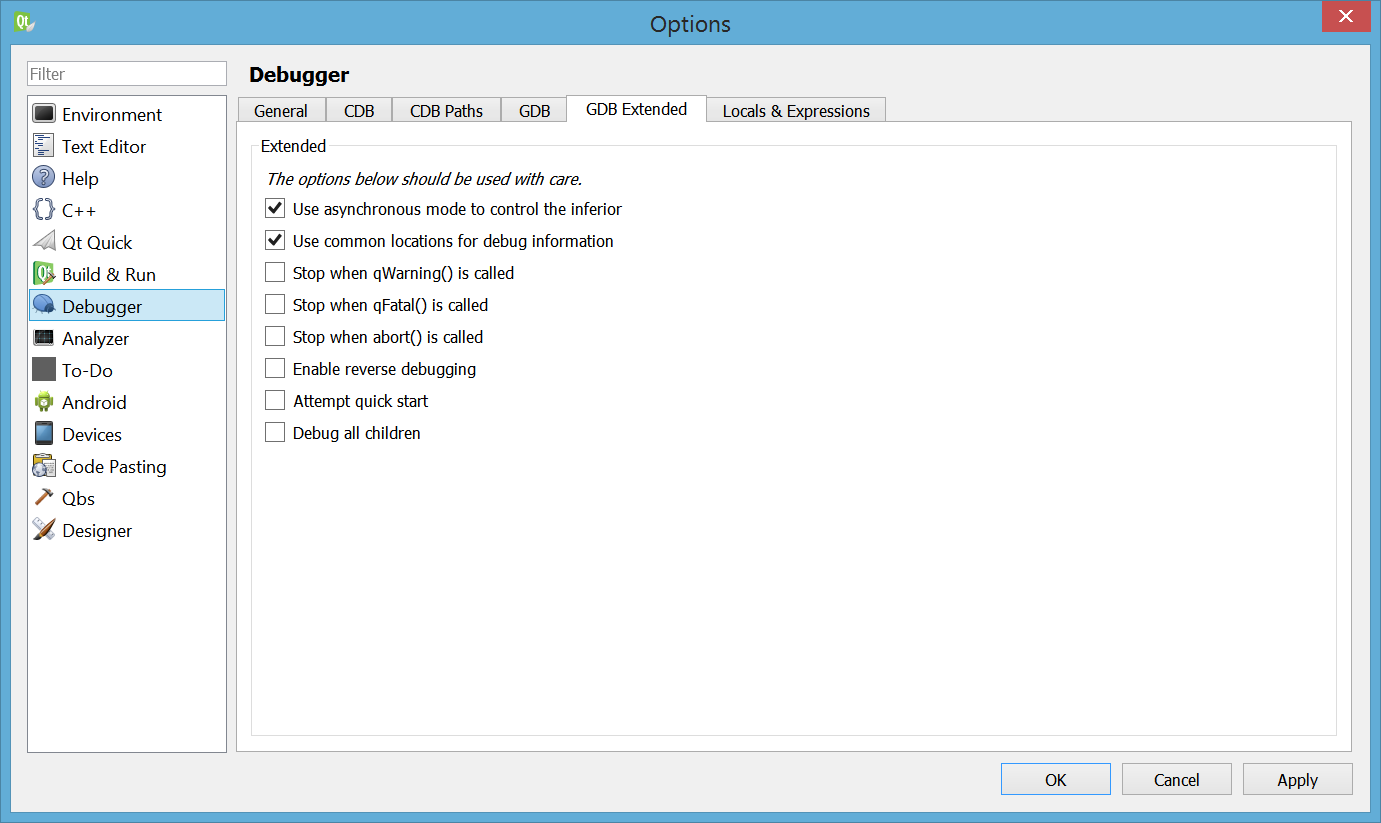
That’s it !
3. Using it : F6, Enter, … and debug now !
-
Assuming you have already deployed your app (containing libgdbserver.so) on your device, now you just have to open the panel "Attach to Running Debug Server…"
| You should really consider binding the F6 key to this action! |

-
And properly fill it, with :
-
the right Kit
-
the server port 5039 (which is forwarded to a unix pipe by the start_gdbserver.py script)
-
the right app_process (see 2.1. - tag 'important').
-
| Good news : QtCreator will remember these infos. |
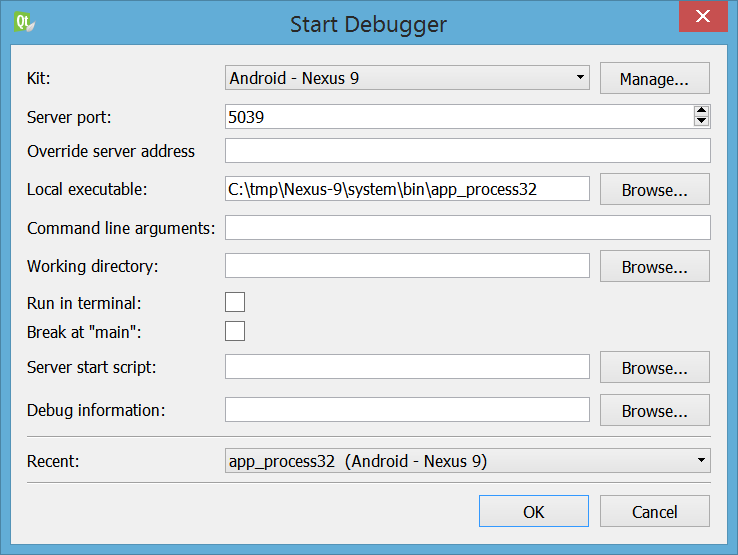
-
Now press "OK", and wait !
⇒ Put breakpoints anywhere in your code, and enjoy !
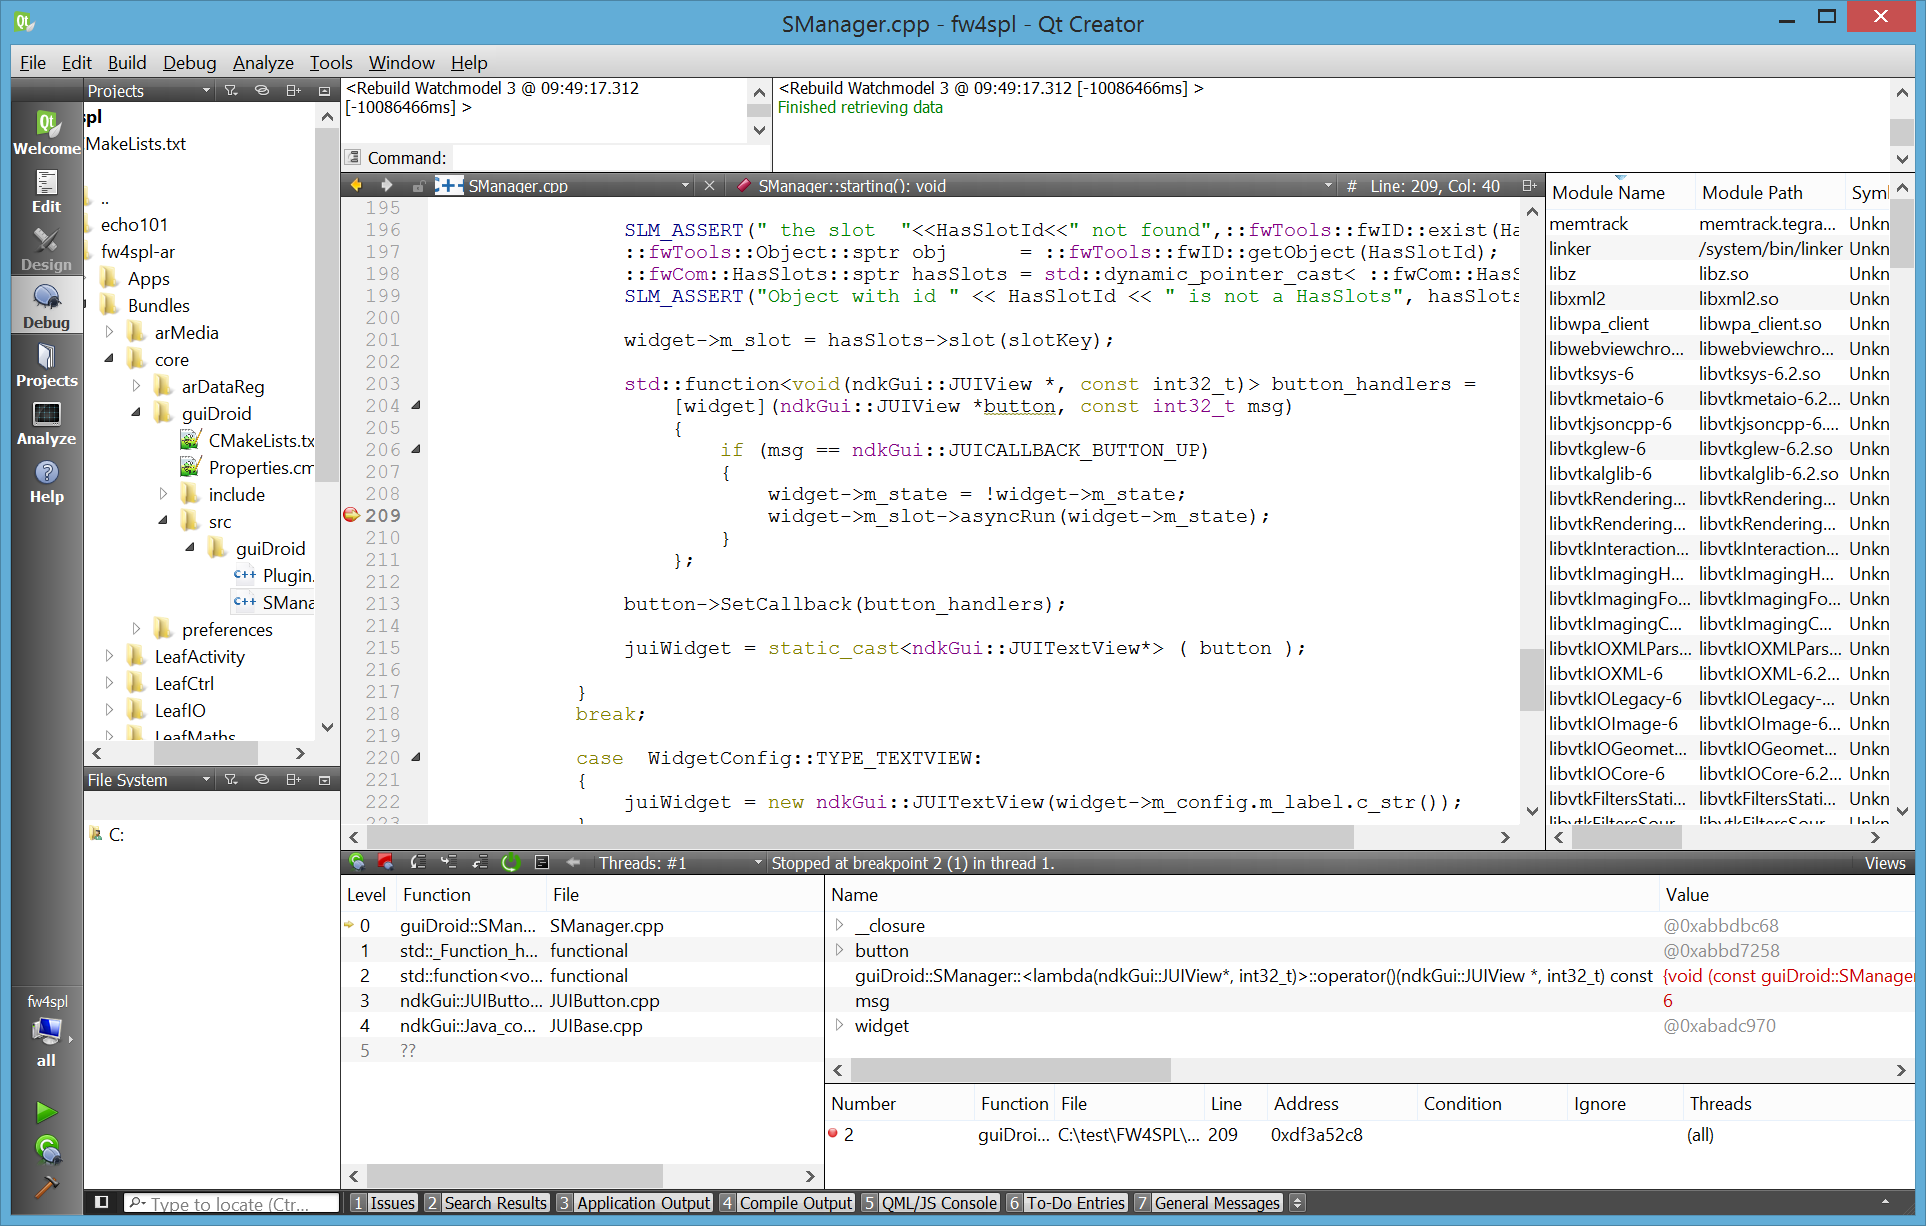
|
Here is what happens behind the hoods when you press "OK" : 1. QtCreator launches gdb… 2. which will execute the script "start_gdbserver.py" (as required by commands we added in "Additional Startup Commands")… 3. then connect to gdbserver (using the command "target remote :5039") … 4. load the libraries… 5. and continue running the app ! |
4. Known limitations
-
On applications linked with many libraries, gdb startup can be really slow… but there is nothing we can do, except from stripping the libs we don’t want to debug.
-
On Windows, the field "Server start script" cannot be used in recent versions of QtCreator (3.4. to 3.5), that’s why we use the gdb command "source".
-
If you want to debug another app, you will have to modify the vars "start_gdbserver.py"…
-
… and modify the "solib-search-path" in the GDB panel.